Thursday, August 28, 2008


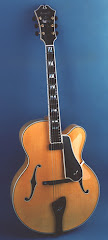
Work continues on the binding - I really need to improve my process and try to limit the amount of spring back from the bending process.
I plan on going back and looking over all of my material and links on the process as a hole, Spring back can cause significant challenges when using wood as a binding material - it's just not that flexible in the cutaway...... I was able to make it work but there has to be an easier way...
Posted by Picasa

Detail of the cut

Here is a pretty good detail of the cut the machine helps achieve...
Posted by Picasa

Wednesday, August 27, 2008

Binding Machine part two.....

Everyone knows that I am no expert but I have to report that the binding machine worked great for me.... I liked feeding the guitar and the router being stationary.....

On to the fun part, wood binding.........

Tuesday, August 19, 2008

Binding Machine

Based on my limited shop space and the fact that I already purchased the plans I built the LMI binding jig. I know the debate continues between jigs the move the cutter or the actual guitar.... I can say that this design is well thought out , seems to operate smoothly and certainly wins in the storage department. I expect I will have first hand knowledge very soon regarding how well it does the actual job..... (Film at 11).

Thursday, August 14, 2008

The Body is one......

Just playing around with the top back and sides in the clamps. So far so good. Of course everything gets very serious when you start to actually glue everything together.... It has been so darn hot,Angel has been a very good sport and put up with a lot of the assembly process in the house.


I used the go-bar deck to glue the top on the body...... I can honestly say this is a real learning experience.... As I move from step to step I have learned there are certain key points to watch for. As the back sides and top become one you really understand the importance of the center line......

Monday, August 11, 2008

OM build continues with the body


Bracing the top on the 25' radius dish.


Installing the kerf-linings in the cutaway.


Here is a good shot of the radius dish used to profile the top.

Pretty busy weekend the goal is to get the box closed up this week.... I would like to start on binding the body, and then build the neck....

Monday, August 4, 2008

Neck, Tail Block and sides in the mold


I worked on the sides, neck and tail block (Sapele) Still not certain if I am going to use the mold method or solera to build the guitar on/in. I bent up enough sides for a couple of guitars so either way I am going to use both methods somewhere down the line....

Here is a shot of the walnut sides in the mold (I ended up making new spreaders bars). Jeff, I used the Drum sander you gave me, it did a real nice job... Everyone could use a friend like you... Thanks again Jeff....


Dean has been very busy on his guitar the far left shows his carving cradle used to graduate the top and back here is a nice shot of the back hope you can see the flames , they are pretty spectacular. There is a really nice tap tone. The lower shot is of the top and the components for the neck and tailpiece.


Saturday, August 2, 2008


Here are some shots of the sides I bent with the heating blanket...... A little bit of a learning curve for sure..... I cracked the first cutaway - not enough heat! I have to say that I had plenty of help and moral support from Ken Hodges, John at Blues Creek and from Greg's video on Luthier Tube see Nelson side bending video.

I used a nice tip I found on Kathy Kathy Matsushita site for profiling the sides http://www.luthiersforum.com/forum/viewtopic.php?f=10102&t=8117&hilit=+side

Anyway here they are in the Solera that I built from Step -by - Step Guitar Making Alex Willis. I might actually try the entire build using this method.